Thursday, May 18, 2017

Create email id without registration

Hello all.
I face many problem while testing email id. Every time i have to create new email id and use that id. It takes more time. i think it is completely waste of time. So i found new way. I used http://www.yopmail.com for testing email.


It is very simple. Open this url and simply enter your name. And this email id is open. No need to signup or password. Its so much easy. You can create email id without registration.


Monday, May 15, 2017

Magento Email id and name change from hard code

If you want to change default sender name and email id from magento, follow these steps :-


1 : Login in FTP and go to this path : app/code/core/Mage/Core/etc/


2 : Open file 'config.xml'
changed these lines :
 <trans_email>
            <ident_custom1>
                <email>custom1@example.com</email>
                <name>Custom 1</name>
            </ident_custom1>
            <ident_custom2>
                <email>custom2@example.com</email>
                <name>Custom 2</name>
            </ident_custom2>
            <ident_general>
                <email>owner@example.com</email>
                <name>Owner</name>
            </ident_general>
            <ident_sales>
                <email>sales@example.com</email>
                <name>Sales</name>
            </ident_sales>
            <ident_support>
                <email>support@example.com</email>
                <name>CustomerSupport</name>
            </ident_support>
        </trans_email>

Do this if you dont want to change any name.

Magento email not sends or transcation emails are not working

Hello

Recently i face one problem that emails are not send by magento. User registration, password reset, sales email are not working. Server is working fine. I  checked lots off code. Nothing found as malicious. In last found that one custom email template is created that causes problems. Even i not used that template. I make it only for testing and i never applied for any email. So be careful while create any template. Even if you are not using, it affect your magento.  Good practice is avoid this type of test codes.


Friday, May 5, 2017

magento admin display 404 error

Hello

I transferred a website to another server. Copied all files and imported database. Frontside is working fine but admin side is not opening. It display 404 error. I re-upload database, cleared catch and sessions. But nothing happen. After i google it. Tried to many solutions. And last one query solved my problem.
Here is the solution.
Go to your phpmyadmin and run this query.

SET FOREIGN_KEY_CHECKS=0;
UPDATE `core_store` SET store_id = 0 WHERE code='admin';
UPDATE `core_store_group` SET group_id = 0 WHERE name='Default';
UPDATE `core_website` SET website_id = 0 WHERE code='admin';
UPDATE `customer_group` SET customer_group_id = 0 WHERE customer_group_code='NOT LOGGED IN';
SET FOREIGN_KEY_CHECKS=1;

I saw that this is happen in shared server.

Wednesday, May 3, 2017

Top 4 jQuery Image Cropping / Resizing Plugins

Uploading big photo take lot’s of space on server, you must have seen this feature on big website like facebook and google+ while uploading profile pic you can crop your photo and resize pic during upload, It helps to choose best size of your photo and also reduce space on server.

1. RCrop – Responsive Cropper Jquery Plugin

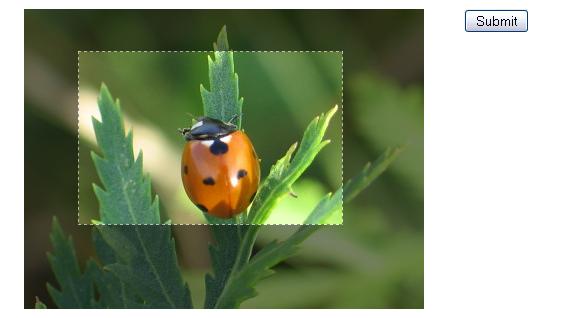
 Responsive Cropper is a JQuery plugin that lets you select an area from an image and prepare crop information to send it to the server.
You don’t need to trigger any event to update crop area when image is resized: this plugin is full responsive. Crop area uses percentages to guarantee full responsiveness, while crop data is stored separately in absolute values.
You can access to crop data easily throw methods, but also plugin makes things easy for you: inputs are are generated and filled with crop information to send to the server.
Last, you can activate a preview or, even, get a base64 image encoded. All that on the client side.
Features:
* Responsive (percentage values)
* Preserve Aspect ratio: shift key or from options
* Easy CSS/SCSS full customization
* Grid
* Minimum and Maximum crop area
* Mobile compatibility
* Methods and Events

DOWNLOAD


2. Simple Cropper

Simple Cropper is a jQuery plugin which gives you ability to add cropping functionality to your web application. It uses html5 canvas to create cropped images and css3, so it only works on latest browsers.
Features:
* Attaches to any div element
* Automatically detects aspect ratio of an element
* Creates new cropped(base64 encoded) image and inserts it into element
* Cropped images are generated client-side
* Support for CSS styling

DOWNLOAD


3. Jquery Cropbox

 jQuery plugin for in-place image cropping (zoom & pan, as opposed to select and drag).
This plugin depends only on jQuery. If either Hammer.js or jquery.hammer.js is loaded, the cropbox plugin will support gestures for panning and zooming the cropbox. Similary, if the jquery.mousewheel.js plugin is loaded, then the cropbox plugin will support zoom in & out using the mousewheel. All dependencies on third party libraries (other than jQuery) are strictly optional. Support for CommonJS and AMD loading is built in.
In browsers that support the HTML5 FIle API and Canvas API, the cropbox plugin provides mehtods to crop the image on the client and obtain the resulting cropped image as a Data URL or a binary blob to upload it to the server.

DOWNLOAD

4. Croppie – A Javascript Image Cropper

Croppie is a fast, easy to use image cropping plugin with tons of configuration options, Croppie is an Html5 canvas based image cropping library that lets you create a square or circular viewport permitting to visually resize an image while preserving aspect ratio and perform a crop. Also can be used as a jQuery plugin.

DOWNLOAD

Tuesday, May 2, 2017

Simple random banner rotator in Magento using static blocks

This is not slider. This is simple image rotator. Every refresh make image changed in page.

In admin panel add N static blocks (“CMS->Static Blocks->Add new block”)
For identifier field use something like this:

SomeBannerIdentifierName_1
SomeBannerIdentifierName_2
SomeBannerIdentifierName_3
...
SomeBannerIdentifierName_N

For each content use this:
<a href="ADDRESS_YOU_WANT_TO_USE"><img src="{{skin url=images/media/IMAGE_YOU_WANT_TO_USE.jpg}}" alt="Some alt text"  /></a>
 
Please note that you are not restricted only to images, you could use text, video or whatever you want here, but I’ll focus on images with links as title says. (you have to create folder  "callouts")
Now when all is set, make new file called banner_rotator.phtml in  “/app/design/frontend/YOUR_INTERFACE/YOUR_THEME/template/callouts/banner_rotator.phtml

 And use this code inside:
<?php
 echo $this->getLayout()->createBlock('cms/block')->setBlockId('SomeBannerIdentifierName_'.mt_rand(1, N))->toHtml()  
?>
 
*Make sure you replace “N” with highest number of your static block
In order to show this block, you should be familiar with Magento layouts.
Since that is out of scope for this article, I’ll show you how to put it below the content on cms pages.
Open “/app/design/frontend/YOUR_INTERFACE/YOUR_THEME/layout/cms.xml
[*] Put this line:

<block type="core/template" name="home.banner.rotator" template="callouts/banner_rotator.phtml"/>
 
 
 Find this:

<cms_page>
<reference name="content">
<block type="cms/page" name="cms_page"/>
 
P U T  [*] H E R E  ! ! !
 
</reference>
</cms_page>
 
Unfortunately I can’t be more specific so feel free to ask me anything.
UPDATE:
If you want this to work for specific page such as homepage do this:
Instead of here /app/design/frontend/YOUR_INTERFACE/YOUR_THEME/layout/cms.xml
put this:

<reference code="content">
<block type="core/template" name="home.banner.rotator" template="callouts/banner_rotator.phtml"/>
</reference>
 
 
or put this code

{{block type="core/template" name="home.banner.rotator" template="callouts/banner_rotator.phtml"}}
 
into your Admin panel’s CMS->Pages->Your page->Design->Layout Update XML field
Everything else is the same…